Showing posts with label diy. Show all posts

Wednesday, February 8, 2012

Quick DIY eyeglass holders

If you sew at all you probably have some small pieces of fleece in your stash of scraps. And if you have more than one person in your house you probably also have eyeglasses and sunglasses stashed in purses, cars, drawers and closets without cases.

Years ago I used up some of my fleece scraps making these very quick eyeglass holders. We still have them and still use them all the time.  I forget how many I made, but I made them in various sizes to hold different size glasses.  Those wrap around type sunglasses really need a big case, but reading glasses only require a slim little case.

I also had some scraps of flannel so I cut some small squares of it with pinking shears, to keep it from fraying, and added an extra, shorter piece of fabric when I sewed the edges of the case together to make a pocket for the little flannel cleaning cloth.

Thursday, May 19, 2011

Progress Report on the Landscaping

When we bought our home in Utah last summer this flower bed by the front steps was a slope of dirt and weeds. We'll be moving soon and I won't get a chance to see how all of my hard work looks once it's had a chance to fill in, but I thought I'd show some photo updates.

How it looks now all terraced and with new perennial plants. The Alberta spruce is a dwarf variety that should only get to be about 5 ft tall. There is another set further back on the other side of the front steps as well. The carpet phlox in the upper portion should gently cascade over the top of the rocks
In progress last autumn. I hauled rocks from elsewhere on the property in to terrace the bed.


Hoping these flowers fill in nicely this summer. The purple and yellow flowers will complement the house color.

Monday, May 16, 2011

Composting: easier than you might think

If you read gardening books, articles and websites today they'll almost always lead you to believe that composting is an art and science for those who are willing to put in the time, space, money and effort. They make you think that the rest of us are better off buying it in big plastic bags at the garden center. What they are not telling you is that your great grandma did just fine with her composting by tossing scraps and yard waste in pile in the corner of her garden or yard.  When she needed some compost, she dug down a little until she found the layer where the compost was ready and used it.

My very simple and cheap compost bin. I planted morning glory seeds around the outside, but they are not up yet.

Great grandma didn't have a $150 black plastic bin that spins, she didn't have a two or three bin system with compost in various states of readiness, she didn't buy special worms, she didn't worry about getting just the right combination of "brown" and "green" materials to compost and she didn't worry about keeping the moisture level of her pile or the temperature at optimum levels. She didn't run her leaves through a shredder before adding them to get them in the right size pieces. Wonder of wonders, she still got great compost for her garden for FREE! She didn't even have to haul it home. She didn't put her potato peelings into a plastic bag to haul to her trash can to set out on the curb getting smelly in the sun and then sitting in a landfill not composting for decades.

We moved into the house we live in in Utah late last summer. I didn't take time to build a compost bin then so I just picked a spot in the garden area and tossed my kitchen scraps in a heap every day. We just have three people in our family so we don't create all that many scraps. Even with all the fruit peelings from canning, pumpkins from carving, daily coffee grounds, egg shells and tea bags and everything else I just had a small pile by spring. Even in frigid Utah temps and utter neglect it continued to break down into nice black compost.

Above you'll see a photo of the inexpensive, easy compost bin I just built. It wasn't really necessary that I have a bin at all, but it does help to keep stray dogs and magpies out. The magpies tend to scratch through it for earthworms and spread the pile out. It also keeps light weight things like dry leaves from blowing out. Simple containment is nice.

To build this bin I reused a metal fence post that I found on the property to anchor it and keep it from blowing away in our high winds. I then staked it in three places with some plant stakes I had. A couple of inexpensive pieces of rebar from the building supply would work just as well. I purchased a roll of 3'x10'  1/2" grid wire from the building supply, gently unrolled it easing it out of it's tight roll, looped it into a circle and used a few plastic zip ties to fasten the ends together. Then I put the wire part over the fence post and staked a plant stake on the other side to secure it in between the two. I used some other plant stakes to pin the other sides down. $16 in materials for this bin that is sturdy and plenty big enough for us.

As I mentioned, there are very few "rules" of composting that you truly have to follow. Here are some common sense things to think about:

1) keep animal products and greasy food out of your compost. Animal products will smell nasty and anything fatty or greasy will keep things from composting properly.
2) don't keep your pile too damp or put too many "wet" or "green" things in it. This will produce a compost that smells like manure and attracts insects. You don't want that. You want compost that smells like good, rich dirt. Layering in "brown" things like dried leaves, corn husks or shredded newspaper will keep this from happening.
3) light and ventilation will keep nasty things like fungus gnats and flies out of your pile. Those black plastic bins are pretty good for dry climates, but an open bin can be better for other places.
4) stirring the pile will help everything break down faster, but if you only have one bin it will mix the nearly done and just added things together which will keep you from using the compost. For a one bin system you can stir it all up well in the early autumn and then just layer things in the rest of the year. In spring you can dig down to find the layers of completed compost.
5) if your pile is very dry it won't break down. This is only really a problem in very dry climates or sheltered areas.
6) consider above factors when siteing your bin. Mine is at the edge of a wooded area to keep it partly shaded so it won't dry out too much and partly sunny so it won't stay too damp. It's about 30 ft from the kitchen door so taking scraps out is easy and right by the garden for convenience.

We'll be moving soon so we didn't till up the garden space.  I couldn't resist planting some heirloom tomatoes for the next residents anyway. These concrete scalloped edging pieces were around trees all over the property I removed them and re-used them here.

Wednesday, January 19, 2011

Have you seen these?


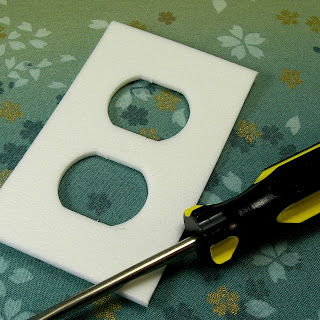
I guess I'm behind the times, but I didn't know about these little things until we had an energy audit done by the gas company recently. They are little foam pads that you place inside the outlets on your exterior walls to insulate them. I just purchased a pack of 6 for $1.97 at Lowes. The energy auditor said they would pay for themselves in no time with energy savings. Find them with the weather striping and insulating supplies at your hardware store. They also have them to fit light switch plates.

The exterior walls of your home should be completely filled with insulation, but the outlet box itself takes up most of the wall space leaving very little insulation between it and the outside wall. Also, if you have sheet insulation instead of blow-in insulation in the exterior walls it's very likely the installer didn't get the little spaces around the outlet filled in very well. On a cold day feel the outlet cover and then the wall beside it. If there is even a little difference in the temperature you are loosing heat (or air conditioning) through the outlet. On the day we had our energy audit, despite the fact we have nice blown-in insulation in the walls, there was nearly a 10 degree difference in the temperature of the outlet and the wall right next to it. All these little "holes in the envelope" suck the warmth right out of your home through conductivity even if they aren't drafty. Most rooms have at least one outlet on every exterior wall. Some of my rooms have several.

These inexpensive foam pads can help quite a bit and only take a minute to install. Who doesn't want to save money on their heating and cooling bills for years to come?

Just remove the outlet cover with a regular screw driver, place the foam pad inside and replace the cover. You will normally just install these in exterior walls unless you know that wiring for interior wall outlets goes through an uninsulated attic space (through a garage or above attic insulation) which can conduct heat or cold temps through the conduits to your outlet.

While you are at it, be sure and check the insulation on your attic hatch. You can loose 10% of heat in your home through a non (or poorly) insulated attic hatch. That's a lot of money and it's an easy fix anyone can make for $5-10.

Tuesday, August 31, 2010

A few things to do . . .

We recently purchased a new house with .4 acres in what I describe as a somewhat "jungly" condition. One of our neighbors mentioned that the previous owner rarely ever mowed.  We have our work cut out for us, but we are looking forward to making improvements. We've been living either in the desert or in an apartment for the last 7 years and haven't even owned a mower in that time, so this is a big change for us.

Here are some "before" photos of upcoming projects:

This is what I call  "the scary slope"  in front of the house. It's got various types of trees, a lot of crown vetch, an assortment of weeds, some junipers and who knows what else is hidden in there? The neighborhood cats enjoy stalking prey here and I'm scared to know what exactly lives in the mess a few yards from my front door. This photo was taken after my husband went after it with a machete. It was spilling out over the concrete making the sidewalk impassable.
This is the official garden area. This is after I spent an hour or more digging out buried tomato cages and pruning back some blackberry canes.  It's still a tangled mess that needs many more hours of work.  I plan to make a compost bin in one corner and a small salad/herb garden and flower cutting garden in the rest--nothing too ambitious.
I call this one the "hidden spruce."  Our yard slopes up in back so that this beautiful blue spruce could be seen from the back of the house nearly at eye level if the scrub oak wasn't in the way. It will be trimmed back a little. My husband already trimmed back some of the small branches.

And this is the front door with a patch of eroding dirt between the sidewalk and the garage and a patch of weeds on the other side. I'm thinking that a smallish conical tree with blue-green foliage on either side would be nice to set off the entrance. I also want to improve the curb appeal by sinking flagstones into the sod in front of the picture window to make a patio seating area to take advantage of the splendid mountain views from there.
The view.  No need to improve that.
Sue

Monday, August 16, 2010

DIY - a little change

I've always wanted to paint the insides of my closets robin's egg blue. I don't know why. Being military, we move around a lot and getting into a house and getting settled right away is usually a priority.  Once those closets are filled with items it has always seemed like too much of a project to empty them and paint them--who is going to notice after all?  This time, I had a long weekend between getting into the house and having our household goods arrive.  I put it to good use.

Coat closet before
Coat closet before
The closets in our new house had only had builder's primer on them for the last 17 years.  I think the builder used up various shades of paint or primer to get the job done.  I found beige, white, grey and a pinkish beige color. One closet had three different colors. The original owners put in a lot of wood shelves, but not all of them got painted so I had bare wood too. I also had builder's notes in pen and childrens' scribbles as well as the typical shoe marks, nail holes and it seems about 50 foam adhesive pads to remove. A previous owner of the home apparently had some sort of addiction to adhesive backed plastic cup hooks.

Pantry After
Pantry After
Above is the soft shade of robin's egg blue in the pantry closet. Afterward I put down thick clear ribbed shelf liner to protect the surface and it looks clean and nice.

A few of the closets got a french vanilla custard type of color instead of the blue and I still have one closet to go, but they do look so much better!

Stay tuned for more house and yard photos of our new place. There's lots still to do.

Sue