This natural pink colored freshwater button pearl set is the same as the peach colored set above except for the fact that it looks wonderful on any woman of any skin tone. The natural pink is a warm pink with mauve irridescence and therefore flatters both warm and cool skin tones with it's depth of color. These sets have the added advantage of coming with a very handy, and pretty, magnetic clasp so they are even great for women who have trouble with tiny clasps.
Thursday, July 30, 2009
$39 necklace and earring sets EVERY DAY
When I lived in Asia and discovered how great the quality of freshwater pearls had become over decades of improvements in culturing them, how reasonable the price had become AND how absolutely exquiste they look against the skin, I wanted to bring that knowledge to others.
Freshwater pearls now come in many shapes, sizes and colors and are very affordable. Women can now own real pearls for same price as fake pearls cost twenty years ago and the quality is actually similar to pearls found in the crown jewels of kings and queens in centuries past! Really, don't get me started . . .
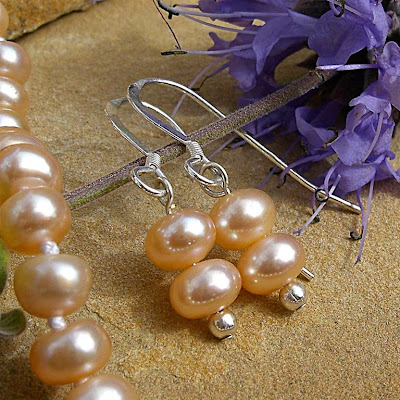
I try to keep a few pearl sets in stock at just $39 each. Above: 5-6mm peach colored freshwater button pearls professinally hand-knotted between each pearl by me on a double strand of silk thread. For extra durability, I cover the silk at the clasp with a tiny coil of metal wire (French wire) to keep the silk from rubbing against the metal of the clasp. Button pearls are often flat on one side or both and therefore give a nice full or lush look to a necklace. This peach color looks incredible on someone with warm peachy skin tones!
This natural pink colored freshwater button pearl set is the same as the peach colored set above except for the fact that it looks wonderful on any woman of any skin tone. The natural pink is a warm pink with mauve irridescence and therefore flatters both warm and cool skin tones with it's depth of color. These sets have the added advantage of coming with a very handy, and pretty, magnetic clasp so they are even great for women who have trouble with tiny clasps.
I stock these in both my on-line store and my Etsy shop.
Labels:
affordable,
button pearls,
earrings,
freshwater pearls,
necklace set,
pearl,
teardrop pearls
Friday, July 24, 2009
I'm Published!
I wrote an article for this awesome on-line newsletter called Home Jewelry Business Success Tips that I have been subscribing to for awhile. It's been an incredible resource for me as a jewelry designer. And now, my article "Banner Design Tips for your Online Jewelry Business" has been published in it. In my article I talk about the process I went through in designing a website banner and other graphics for my website and ultimately how I worked with a very knowledgeable designer for a very custom look.
Monday, July 20, 2009
"Awash" Treasury
I made this treasury on Etsy.com and it's about to expire, but I wanted to preserve it here. I don't curate treasuries very often, but I do enjoy showcasing some of the wonderful artwork found on Etsy. Notice the colorful Tutti Fruitti crochet bowl? That is by Beth from TheYarnChick who is on my Homefront Team on Etsy. And that sparkling mosaic cross is by Cherry of cherryscreations from my Christian Artists Street Team.
Friday, July 17, 2009
Jewelry Photos: Before & After
When I started making jewelry, friends and family wanted to see it. So I took some photos with my cheap little point and shoot camera. It didn't take me long to realize that there is a real art to photographing small shiny objects close up. One of these days I may know enough about it to write a tutorial, but for now I thought I'd show how I've improved over the last two years and share a few things I've learned. NOTE: I'm still using the exact same camera. Thanks to Gary for the photography tips!
BEFORE
This is actually a lovely set with a carved carnelian dragon pendant and green lace agate and carnelian beads. It's very hard to tell from this photo! I heard that natural light was best so I took this on my balcony when we lived in South Korea and yet it's still dark and fuzzy, the angle doesn't let you appreciate the piece and the composition is static.
AFTER
This is a new set that uses the same type of carnelian dragon bead in the pendant. I've learned to adjust the camera for better light and crispness, to photograph from a low angle, get really close-up and then crop the shot afterwards, to use an intriguing background and props to style the shots, and that I don't need to show the entire set in the first product shot on my website.
BEFORE
Believe it or not, this was a beautiful set using a black lip shell pendant that had Japanese wildflowers decoupaged on it's surface and garnet beads with black pearls. This was my attempt at a detail photo.
AFTER
My new attempt at a detail photo of a different set with a beautiful red jasper pendant--much better results!
BEFORE
This was a beautiful set. It even looks pretty good in this dreary photo. I wish I had gotten a better shot of it.
AFTER
This shot has none of the darkness and cast shadows of the previous shot, you can see every detail so that it looks like you can reach right out an touch it--a necessity when selling on-line where people cannot touch or try things on. Styling the shot outdoors in a natural setting with a touch of greenery makes it more appealing.
I'm searching for a new camera and hope my shots continue to improve.
Labels:
before and after,
how to,
jewellery,
jewelry,
photographs,
photography,
tips
Tuesday, July 14, 2009
Gift Bags / Pillow Cases ?
I love items that have multiple uses and are eco-friendly. I grew up in house where gift wrap was often made from a cereal box and the comics section of the newspaper. For years I have been using inexpensive fabrics to make my own re-usable gift bags. My family loves my gift bags too because they make it so fast and easy to wrap gifts and wrapping odd shaped items is no problem.
My son, Caleb had his 8th birthday party the other day. He picked fabric from my stash of oriental print cotton fabrics that I purchased when we lived in South Korea. I whipped up these travel size pillow cases that double as goodie bags for his party.
Each child took one of these home filled with some toys and goodies and they can use them again as gift bags or put a travel sized pillow inside for car trips or sleepovers. When I make bags that do not double as pillow cases, I sew satin ribbon right into the seam to use to tie the bag closed and sometimes also sew gussets into the bottom corners so the bag has a flat bottom.
These also worked well for when the kids broke open the pinatas my son made. There was plenty of room in the bags that the kids could stuff their candy treasures inside.
Above: These are the pinatas that my son made for his party. The small one is a Malayan tapir (Caleb's favorite animal). The spider was fun as a pinata as it lost an eye or a leg with every good whack, which the kids liked. It looked cool hanging from its string upside down.
Labels:
bag,
craft,
eco-friendly,
economical,
gift,
green,
household,
idea,
kids party,
party,
pinata,
recycle,
tips
Wednesday, July 8, 2009
Household Tip: a little light
Small flashlights seem to multiply at our house. They are tucked away in junk drawers, nightstands, on keychains, in vehicles and camping gear. Yet, when the lights go out, we can't seem to find one in the dark.
Hammer a small nail into a wall in a convenient, yet out of the way, spot and hang the small flashlight. Many small flashlights have lanyards attached already or attach one or a piece of string.
Above: I attached a jewelry lanyard to this flashlight and hung it in the cupboard under the stairs. There is a light in that closet, but the closet turns a corner and the back of the "L" is always dark.
Above: This flashlight hangs in my garage just beside the door to the house. We don't have a basement, but if we did I'd hang on near the stairs. Utility rooms, tool sheds and pantries are also good places.
Subscribe to:
Posts (Atom)